Biking is a wonderful way to enjoy the outdoors. However, an accident can happen that could cause your bike rim to bend. A bent rim can lead to poor handling and uncomfortable rides. Fortunately, straightening a bike rim is a task that many cyclists can do themselves. This article covers the steps and methods to straighten your bike rim properly. We will explore tools needed as well as techniques for effective repair.
Understanding the Problem of a Bent Rim
What Causes a Bent Rim?
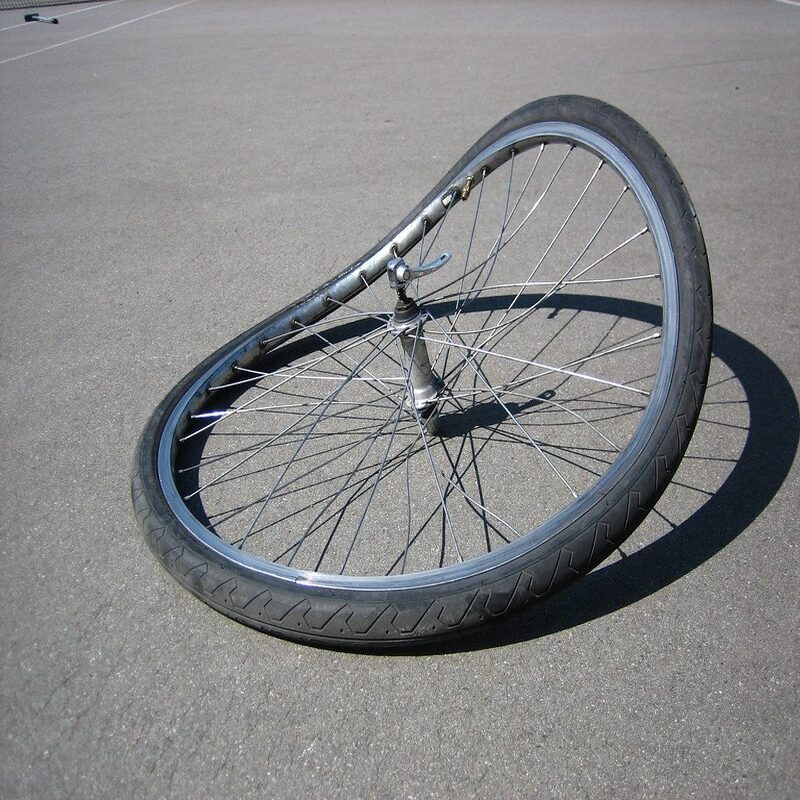
A bent bike rim can happen for various reasons. The most common cause is hitting a pothole or curb. Even riding over rough terrain can lead to damage. Each of these scenarios can cause the rim to lose its true shape. When a rim bends, the wheel may wobble while spinning. This is not only uncomfortable but can also pose safety risks. Therefore, it’s crucial to address this issue promptly.
Another reason rims may bend is from manufacturing defects. Occasionally, a poorly made rim may not withstand regular stress. In that case, it can deform under normal usage. Before trying to fix it, take a moment to inspect your rim closely. Knowing the cause can help determine the best approach for correcting it.
Signs Your Rim Needs Straightening
Recognizing the signs of a bent rim is essential for timely repair. One of the first indicators is a noticeable wobble when riding. If you look at the wheel while riding, you may see it bouncing or wobbling side to side. Additionally, you may hear unusual noises, such as rubbing or clanking. These sounds often indicate that the rim is out of true.
Another telltale sign is inconsistent braking performance. If the brake pads touch unevenly, it’s likely the rim has bent. In such cases, consider inspecting your wheel at the first opportunity. If you notice any of these signs, you should act quickly to straighten your rim. Ignoring these issues could lead to further damage or accidents.
Tools and Equipment Needed for Straightening a Rim
Essential Tools for the Job
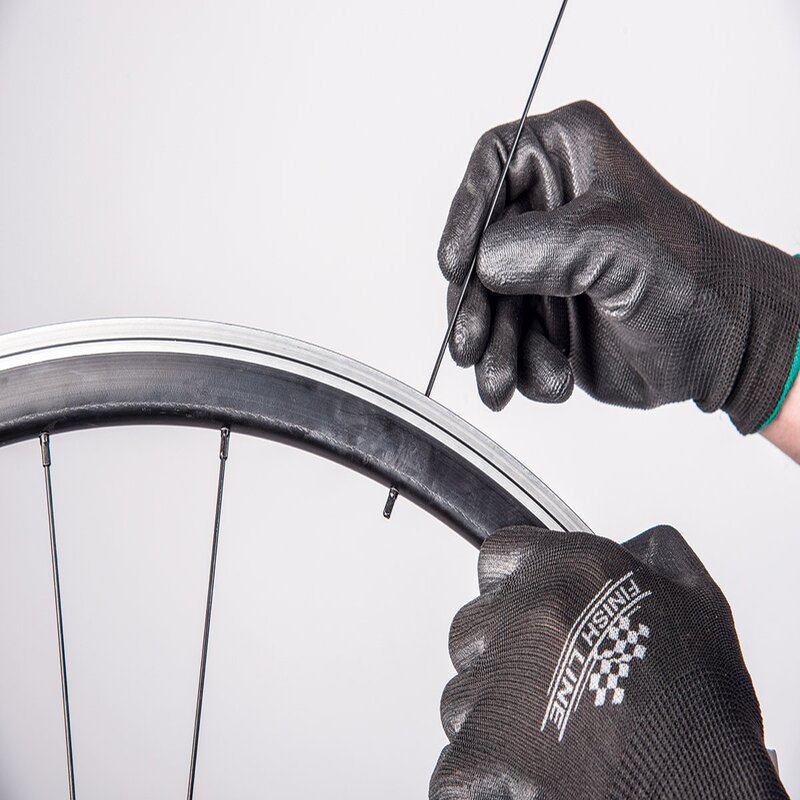
Before you begin the rim straightening process, gather the necessary tools. A few essential tools include a truing stand, spoke wrench, and a ruler. These items will help you properly align the rim again. A truing stand is especially useful for providing a clear view of the rim’s alignment. However, if you lack a truing stand, you can also use your bike frame.
Next, a spoke wrench is crucial for tightening or loosening spokes. This tool allows you to make precise adjustments. Additionally, a ruler helps measure gaps between the brake pads and rim. This measurement is vital for ensuring a properly trued rim. Before starting, check that your tools are in good condition. Having the right tools streamlines the process significantly.
Optional Tools
While the essential tools are critical, some optional tools can make your task easier. For instance, a pair of pliers can assist in handling stubborn spokes. Some cyclists also find it helpful to have a rubber mallet available. This tool can gently tap bent rims back into shape without causing further damage.
Other optional tools include a bike repair stand and a flashlight. A bike repair stand provides stable positioning while you work. Also, a flashlight may help you see any bends or issues more clearly. Even though these tools are not necessary, they can enhance your repair experience.
Preparing Your Bike for Repair
Safely Removing the Wheel
To begin the repair, you must safely remove the affected wheel from your bike. Start by placing your bike in a stable position. If you have a bike repair stand, utilize it to hold your bike securely. If you don’t have one, flipping your bike upside down may also work. This positioning allows you to access the wheel easily.
Next, use a quick-release lever or an adjustable wrench to loosen the wheel. Ensure that the brake cables are not interfering with the wheel removal process. For bikes with disc brakes, make sure the rotor clears the caliper as you pull the wheel out. Pay attention to how the components connect and remember the order for reassembly later.
Inspecting the Wheel
Once you’ve removed the wheel, thoroughly inspect it for any damage. Look for not only bends but also cracks, dings, or other signs of wear. Each of these issues can affect the wheel’s performance. If the damage is extensive, consider consulting a professional before proceeding.
Next, observe the spokes and see if they are loose or tight. This examination will help you identify which spokes need adjustments. A thorough inspection ensures you’re aware of all issues, allowing you to address them more effectively. Gathering this information creates a solid plan for repairing your rim.
Straightening the Bike Rim: The Step-by-Step Process
Positioning the Wheel and Attaching It
After inspecting, place the wheel in your truing stand. If you’re using a bike frame, lay it flat on the ground. Ensure you have a clear view of the rim. This positioning will help you easily identify where adjustments are needed. If you have a flashlight, use it to illuminate the rim for better visibility.
Next, spin the wheel slowly and observe how it wobbles. Take note of any high or low spots, as these areas will need further adjustment. Mark these spots in your mind, or use a piece of chalk if necessary. Understanding where the problems lie is essential for a successful straightening process.
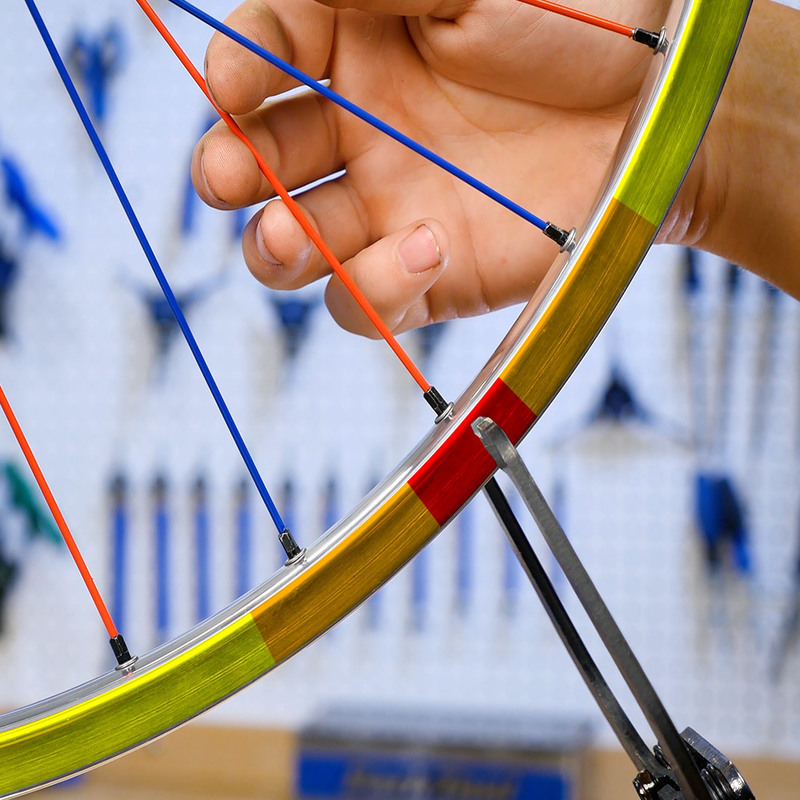
Tensioning the Spokes
Now it’s time to begin adjusting the spokes. Using your spoke wrench, tighten spokes that appear loose. Pay special attention to the bends or wobbles you previously marked. Start with the spokes on the same side as the bend. Tightening these spokes will help pull the rim back into shape.
As you tighten, keep checking to see if you’re making progress. A small adjustment can make a significant difference in the rim’s alignment. Each tightening should be done cautiously to avoid overtightening. Over-tightening can strip the threads or cause further damage.
Checking Final Alignment
After tensioning your spokes, spin the wheel again to check for improvements. Observe if the wobble has decreased or disappeared. If the rim is still off, repeat the process of tensioning and checking again. It may require multiple adjustments to get the rim perfectly true.
Once you’re satisfied with the alignment, measure the distance between the rim and brake pads. The goal is to ensure they are even on both sides of the rim. If everything looks good, you can proceed to the last steps of the process.

Reassembling Your Bike
Reinstalling the Wheel
Once you have straightened your rim, it’s time to put the wheel back on the bike. Start by aligning the axle with the dropouts. Gently push the wheel into position and secure it using your quick-release lever or wrench. Make sure it fits snugly without forcing it in.
Check the alignment of the brake pads once the wheel is secured. They should be evenly positioned around the rim. If adjustments are necessary, don’t hesitate to fine-tune them before taking your bike for a ride. Proper alignment ensures optimal brake performance, making your rides safer.
Conducting a Test Ride
After reassembling, take your bike out for a short test ride. This ride allows you to feel the improvements. Pay attention to how the bike handles. If you still notice any wobbles or quirkiness, you may need to repeat the previous steps.
Make sure to assess braking effectiveness during your test ride, as well. If the brakes function smoothly, you’re good to go. Always heed your bike’s feedback after any repair. This constant awareness can help you maintain your bike’s performance over time.
Conclusion
Straightening a bike rim is a task that many cyclists can handle by themselves. By understanding the problem, gathering the right tools, and following the proper steps, you can achieve results. A well-maintained bike enhances your riding experience significantly.
Make sure to inspect your bike regularly to prevent major issues. Remember that practice makes perfect, and skill improvement comes over time. Straightening the rim may seem daunting initially, but you will gain confidence with every attempt.
Lastly, share your experiences with fellow cyclists. Your insights may help others who encounter similar problems. Happy riding, and may your wheels always stay true!