Maintaining your bike’s brake system is crucial for safe riding. A well-functioning braking system ensures optimal performance on various terrains and conditions. Over time, air can enter the brake lines, leading to a spongy feel during braking. While many riders feel daunted by the process, bleed bike brakes is manageable. A detailed understanding of the process can empower bike owners to tackle this task successfully.
Understanding Brake Systems
Types of Bike Brakes
Bike brakes generally fall into two categories: rim brakes and disc brakes. Rim brakes exert pressure directly on the rim. This creates friction, slowing down the bike. They are often lighter and simpler to maintain. Conversely, disc brakes utilize a rotor attached to the wheel. They offer better stopping power, especially in wet conditions, due to their design. Each system has specific bleeding requirements. Knowing the type of brake you have is crucial for successful maintenance.
Symptoms of Air in Brake Lines
Detecting air in the brake lines is vital for timely intervention. Common signs include a soft or spongy brake lever. This indicates that the hydraulic fluid may have lost its effectiveness. Moreover, you might experience differences in brake response time. In some cases, the brakes might not engage fully even with significant lever pressure. If your brakes feel sluggish or inconsistent, it may be time to bleed them. Regular checks can prevent serious issues, ensuring a safer riding experience.
Preparing for the Bleeding Process
Gathering Necessary Tools
Before starting the bleeding process, gather all essential tools. You will typically need a few items: a bleed kit, fresh hydraulic fluid, and a clean rag. A significant part of ensuring a clean process involves preparing your workspace. Using a workbench or a stable surface helps keep everything organized. Make sure to wear gloves and goggles to protect against any spills. The right tools make the process smoother and more efficient, reducing the likelihood of mistakes.
Familiarizing Yourself with the Procedure
Each bike model and brake system may have unique bleeding protocols. Therefore, consulting the bike manufacturer’s instructions is essential. This not only informs you of the proper procedure but also highlights the specific fluid type to use. Familiarizing yourself with the steps aids in efficiency during the actual process. Watching instructional videos or reading guides can enhance your understanding. Although the task may seem intimidating, preparation is half the battle.
Step-by-Step Bleeding Guide
Step 1: Remove the Wheel (if necessary)
Depending on your brake type, you may need to remove the wheel. If you have disc brakes, clear access to the brake caliper is crucial. Removing the wheel will give you easier access to the bleed port. Additionally, you’ll want to ensure you don’t damage anything during this process. Secure the bike in a stable position using a work stand or vice. This setup will allow for easier maneuverability and focus on the task at hand.
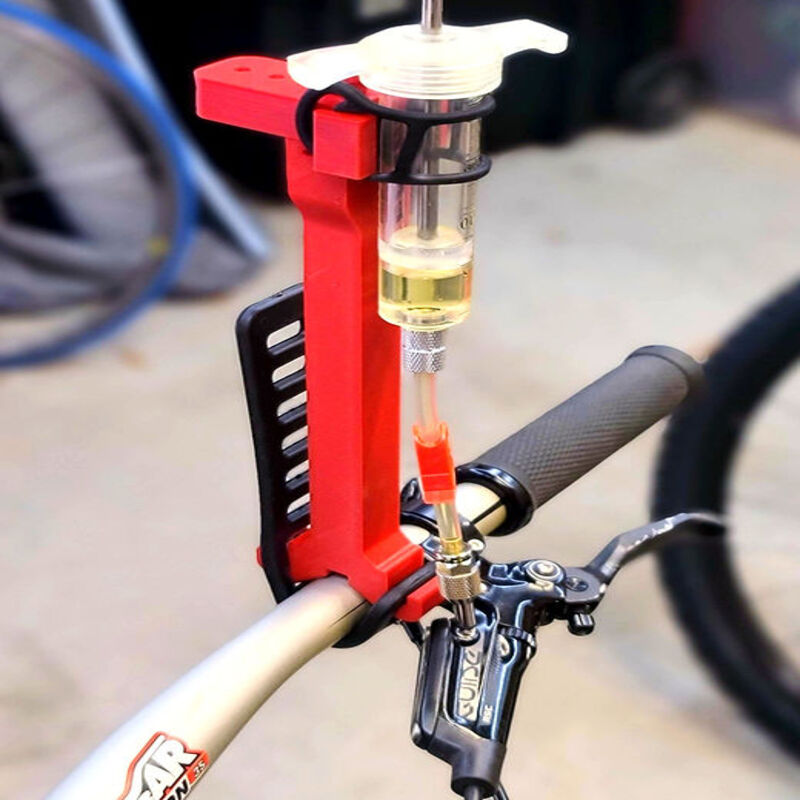
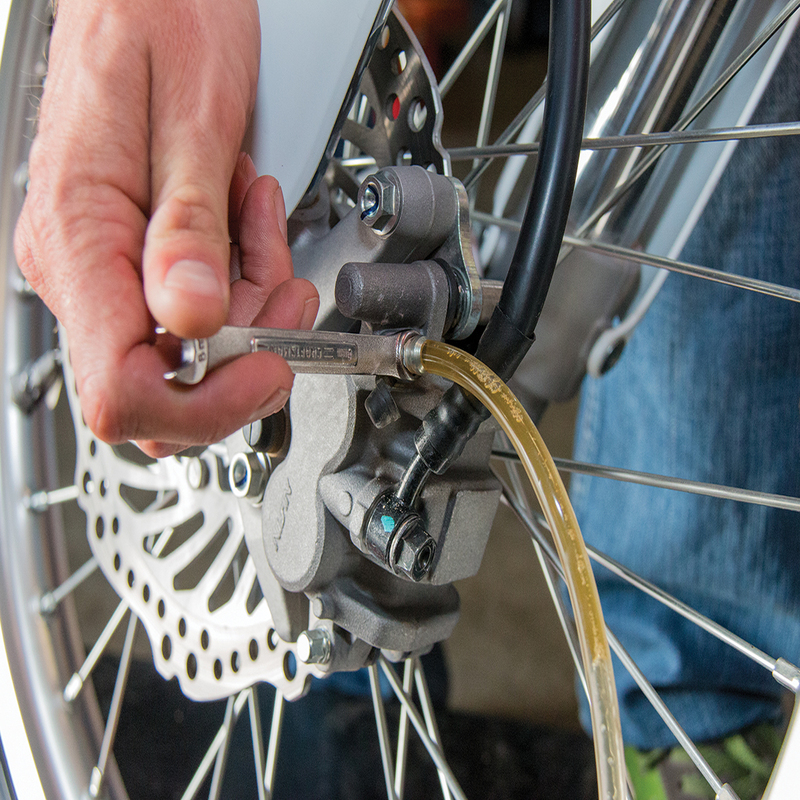
Step 2: Attach the Bleed Kit
Next, attach the bleed kit to the caliper. Most kits come with a syringe that helps push fluid through the system. Connect the syringe to the bleed nipple, ensuring a snug fit. If the connection is loose, air may still enter the system during the bleeding process. Once securely attached, slowly pull the plunger on the syringe. This action will begin to draw old hydraulic fluid out of the brake line. Be patient; this part of the process is crucial for effective bleeding.
Step 3: Apply Fresh Hydraulic Fluid
After removing old fluid, it’s time to introduce fresh hydraulic fluid. With the syringe still connected, push the new fluid into the brake line. This will force out any remaining air bubbles trapped in the system. Ensure to keep a close eye on the fluid reservoir. It must not run dry during this phase. If it does, you’ll need to repeat previous steps. Maintaining a consistent flow of new fluid is key to achieving a properly bled brake system.

Finishing up the Process
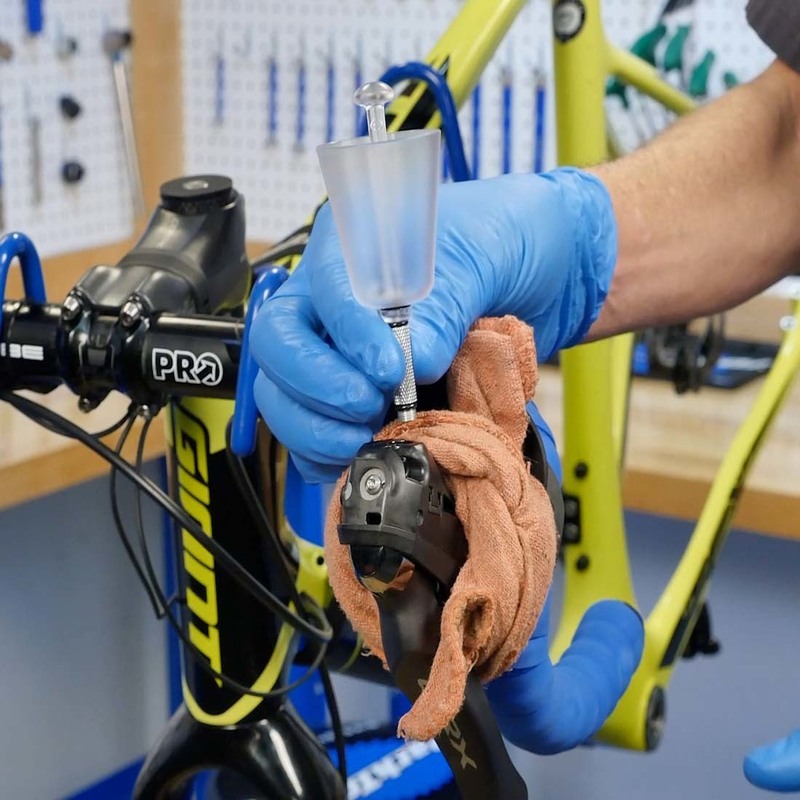
Step 1: Remove the Syringe
Once you are satisfied with the fluid and believe all air has been expelled, it’s time to remove the syringe. Carefully unscrew the syringe from the bleed nipple, ensuring minimal fluid spillage. Ideally, you should have someone assist you during this part, as it can be a bit tricky. If any fluid drips out, promptly clean it up to prevent damage to your bike’s paint or components. A clean workspace helps maintain an optimal environment for future repairs.
Step 2: Tighten the Bleed Nipple
Once the syringe is detached, remember to re-tighten the bleed nipple securely. This small part is essential for maintaining the integrity of the brake system. Over-tightening can cause damage, while under-tightening can lead to fluid leaks later. Assess the fitting carefully. When you’re satisfied, you can move on to the next step with peace of mind. Consistency in maintenance practices will prolong the lifespan of your brake system.
Step 3: Check for Proper Brake Function
After securing everything, it’s time to test your brakes. Before reassembling the bike, pump the brake lever to ensure a firm feel. If the lever feels spongy, repeat the bleeding steps. It’s crucial that your brakes engage promptly and effectively before you hit the road. A quick test run, even in a controlled environment, can confirm that your hard work has paid off. Safety should always be your top priority when it comes to riding.
Bleeding Mechanical Brakes
While bleed bike mechanical brakes may be different, it’s still necessary to ensure optimal performance. Although air isn’t typically a concern, cable adjustments can often make a significant difference in braking power.
Inspection of Cable and Components
Start by inspecting the brake cables for wear and tear. Look for frays, kinks, or anything that may impair function. If the cables are in poor condition, they should be replaced before proceeding. Additionally, check the brake pads for excessive wear. If they are worn out, it’s best to replace them to ensure proper stopping power.
Adjusting Brake Tension
Once you have confirmed that cables and components are in good condition, it’s time to adjust the tension. Use the barrel adjuster on the brake lever or caliper to make necessary adjustments. The brake lever should pull smoothly and engage firmly. Take your time to make these adjustments, as they can significantly improve brake performance.
Maintaining Your Brake System
Regular Inspection
Regularly inspecting your brake system is critical for optimal performance. Look for signs of wear or any corrosion on brake components. It’s also wise to check the hydraulic fluid level periodically. Should it look dirty or discolored, it’s time for a change. Maintaining your system helps avoid serious issues down the line. Consistent inspections can highlight any problems before they escalate, ensuring a longer lifespan for your braking components.
Scheduling Routine Bleeding
Depending on your riding frequency, schedule routine bleeds at least once a year. If you ride often or in harsh conditions, consider more frequent bleeding. Each time you ride, assess the brake feel. If any change is noticed, it may indicate the need for attention. Staying proactive with bleeding can prevent emergencies during your biking adventures. Remember, a little maintenance goes a long way.
Conclusion
Knowing how to bleed bike brakes is vital for every cyclist. It ensures not only your safety but also enhances the overall biking experience. Taking the right steps and precautions minimizes the likelihood of mistakes. Gathering tools, understanding the system, and following a structured approach makes this task manageable. As a rider, staying informed and prepared will enhance your maintenance skills.
In conclusion, don’t overlook the importance of brake maintenance. Regularly inspecting and bleed your bike brakes is critical for performance. Doing so can mean the difference between a safe ride and an accident waiting to happen. As you gain experience, you’ll feel more confident in handling bike brake issues. Keep riding, keep maintaining, and enjoy your time on the trails.